How to Propagate Black-Eyed Susan for Vibrant Garden Growth
Last updated: January 30, 2026
Propagating black-eyed Susan (Rudbeckia) is actually pretty simple, and it lets gardeners quickly fill their flower beds with even more color. The best ways to do it? Division or seed collection work great, and both methods encourage healthy new plants.
You can go with either option depending on your style and timing, so Rudbeckia really is approachable for just about anyone. That’s part of its charm.

Black-eyed Susans are tough perennials and handle a lot of different environments. If you follow a few basic care steps, propagation usually goes smoothly.
You can divide older plants in early spring or fall. Or, wait until after they flower and collect the seeds to start new ones. Knowing both techniques means you can keep black-eyed Susans blooming in your garden year after year.
Preparing to Propagate Black-Eyed Susan
Getting ready to propagate starts with good timing, picking the right plants, and grabbing the tools you’ll need. Each detail can make the difference between weak seedlings and strong, thriving black-eyed susans.
Choosing the Best Time to Propagate
Early spring or late summer—those are the sweet spots for propagating black-eyed Susans. In spring, roots have time to settle before summer heat. Late summer gives them a head start before winter kicks in.
If you avoid the hottest and coldest parts of the year, your new plants will thank you. Garden centers often have seeds and cuttings available during these times, too.
Don’t forget about your local climate. In cold places, you might want to wait until late spring to dodge any late frosts. If you live somewhere warm, early fall is usually safe for root growth before things cool down.
Selecting Healthy Parent Plants
Pick black-eyed Susans that look vigorous and happy. Skip any plants with pests, disease, or yellow leaves.
Strong roots and sturdy stems are what you want. If you’re taking cuttings, look for branches that aren’t flimsy. If you’re dividing, check for a robust root ball.
Look closely at the plants in your garden or at the nursery. Don’t settle for stressed-out, damaged specimens—they just won’t give you the best results.
Gathering Materials and Tools
You don’t need a ton of gear, but a few basics make life easier:
- Sharp pruning shears
- Garden gloves
- Rooting hormone (optional, but honestly, it helps)
- Small pots or seed trays
- Good potting soil or compost
Clean, sterilized tools help prevent disease. Choose soil that drains well and isn’t too heavy. Rooting hormone can speed up the process, especially if you’re working with cuttings.
When you have everything ready before you start, the whole process just goes more smoothly.
Propagating Black-Eyed Susan from Seeds
Black-eyed Susan seeds need a few specific things to sprout and grow into healthy seedlings. Paying attention to soil, moisture, and light makes a big difference.
Sowing Seeds Indoors
Fill seed trays or small containers with a light, well-draining seed starting mix. Mist the surface to dampen it—don’t soak it or you’ll make a mess.
Press seeds gently into the soil, but don’t bury them; they need light to germinate. Keep trays at 70-75°F (21-24°C). Place them under grow lights or near a sunny window for 12-16 hours of light each day.
Mist the soil regularly to keep it moist, not soggy. Seeds usually pop up in 7 to 14 days. Once you see the second set of leaves (the “true” leaves), thin out the weaker seedlings with scissors.
Sowing Seeds Directly Outdoors
Wait until after your last frost and make sure the soil is at least 60°F (16°C). Loosen the soil about a foot deep and pull any weeds.
Sow seeds about ⅛ inch deep, either in rows or just scatter them around. Keep the soil evenly moist with a gentle spray. You’ll usually see sprouts in 10 to 21 days, depending on the weather.
When seedlings are up, thin them out so there’s about 12-18 inches between each plant. Mulch helps keep the soil moist and blocks weeds.
Factors Affecting Seed Germination
Soil temperature and moisture matter a lot. Indoors, aim for 70-75°F; outdoors, above 60°F is best.
Don’t let the soil dry out, but don’t drown the seeds either. Too much water causes rot, while dry soil stops germination. Use well-draining soil to avoid soggy conditions.
Seeds need light, so don’t bury them too deep—⅛ inch is enough. Watch for pests or mold, especially if things get too damp.
Transplanting Seedlings
Once seedlings have 2-3 sets of true leaves and the weather is mild (no frost), start hardening them off. Take them outside for a few hours a day over a week or so.
Pick a sunny, well-drained spot. Space them 12-18 inches apart. Be gentle with the roots when transplanting, and dig holes just a bit bigger than the root ball.
Water them right away and keep the soil moist while they settle in. Don’t plant them too deep—keep the stem base above the soil to avoid rot.
Propagating Black-Eyed Susan by Division and Cuttings

You can multiply black-eyed Susans through division or stem cuttings. Both methods work, but you’ll need the right timing and a bit of care.
Watch out for overwatering—root rot is a real risk if you’re not careful.
Dividing Established Plants
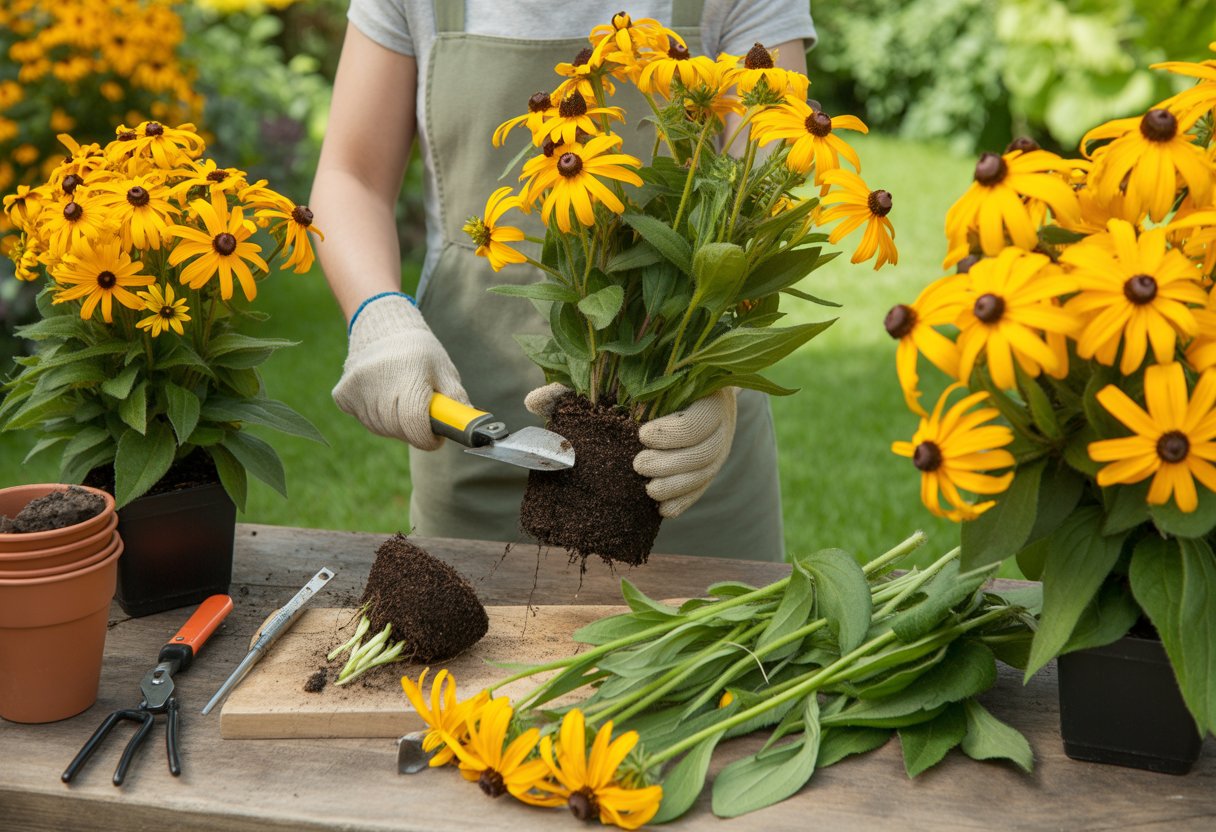
Division is easiest in early spring or late fall, when the plant isn’t actively growing. Dig up the whole plant and gently pull apart the root clumps.
Each new chunk should have several roots and some healthy shoots. Replant the divisions right away, keeping them at the same depth as before.
Give them a good soak, but again, don’t drown them. Mulch helps keep moisture in and weeds out.
A little fertilizer can help divisions get started. Once settled, deadheading spent flowers encourages more blooms.
Rooting Stem Cuttings
Pick healthy, non-flowering stems in late spring or early summer. Cut 4-6 inch pieces, snipping just below a leaf node.
Remove the lower leaves so the stem doesn’t lose too much moisture. Dip the cut end in rooting hormone, then stick it in a moist, well-drained mix like perlite or peat.
Cover the cuttings with a plastic bag or put them in a propagator to keep humidity up. Keep the mix damp but not soggy. Roots usually show up in 2-4 weeks.
When roots are established, slowly get the new plants used to outdoor conditions before planting them out.
Caring for New Plants
Water new plants when the top inch of soil feels dry. Don’t let them sit in soggy soil—good drainage is key.
Start them off in bright, indirect light, then move them to full sun once they’re growing well. Deadhead regularly to keep them blooming and push energy into roots and leaves.
Keep an eye out for pests or disease, especially when plants are young. Adjust water and light as needed—sometimes you have to experiment a bit to see what they like.
Caring for and Planting Propagated Black-Eyed Susans

Black-eyed Susans need the right spot and a little attention to really thrive after you propagate them. Things like sunlight, soil, water, and keeping pests away all play a part.
Selecting and Preparing Planting Sites
These flowers love full sun, though they’ll tolerate some shade. Aim for at least 6 hours of direct sunlight each day if you want those bright blooms.
The planting area needs to drain well, or you risk root rot. Mixing in compost or organic matter helps the soil and gives plants a boost.
Space your plants about 12 to 18 inches apart. That way, they have room to grow and air can move between them—less chance for disease.
Optimal Soil and Sunlight Conditions
Use garden soil mixed with compost to hold moisture but still drain well. That combo keeps roots happy.
Soil pH should be neutral to slightly acidic, around 6.0 to 7.0. If you’re not sure, test it—better safe than sorry.
Full sun brings out the best blooms. If you’re growing in pots or baskets, put them in the sunniest spot you’ve got.
Watering and Fertilizing Techniques
Keep the soil consistently moist for the first few weeks after planting. Don’t overdo it—waterlogged soil is bad news.
Once they’re established, black-eyed Susans handle some dry spells, but they do appreciate a deep watering once a week during droughts. Water at the base to keep the leaves dry.
A little fertilizer in spring—a balanced, slow-release type or even compost tea—gives them a good start. Too much fertilizer can mean lots of leaves, but not many flowers, so go easy.
Pest and Disease Prevention
Powdery mildew shows up often with these plants. Skip overhead watering and give them room to breathe so air can move around.
If you spot infected leaves, pull them off early. That really helps keep things from getting worse.
Black-eyed Susans pull in pollinators—bees, butterflies, you name it. But they’re not immune to pests like aphids or Japanese beetles.
Try insecticidal soap or neem oil to handle pest problems. These options let you protect your garden buddies without harming the good bugs.
Keep an eye on your plants and aim for overall health. That way, you’ll dodge bigger problems down the road.
![]() Looking for a nursery that carries native black-eyed susans?
Looking for a nursery that carries native black-eyed susans?
Browse our native plant nursery directory


